Building a simple kite
Many people love the idea of building their own kites.
-
Pros:
When you make your own kite, you control the size, shape, and quality of the build.
The kite is sure to bring you many years of enjoyment.
You can customize the color, design, and flight characteristics of the kite. -
Cons:
You can buy a cheaply made kite for a few dollars.
You can fly it for a day or two, and if it gets caught in a tree, you are not out the expense of the well built kite.
Materials:
You will need a supply house which can provide quality materials for your kites. You can make kites out of paper, Garbage bags, Tyvec or other fabrics. I make my kites out of Rip Stop Nylon. It is easy to work with, resists tearing, often includes UV protection to avoid color fading, and is very light. Most quality kites are made out of Rip Stop Nylon. Many artistic kites are made of paper.
I can recommend a good place to start your shopping. Goodwinds in Mount Vernon, Washington State, has many of the supplies you will need. I have no affiliation with this company, I have used them to obtain many items I use in kite construction. I have found their products to be top notch.
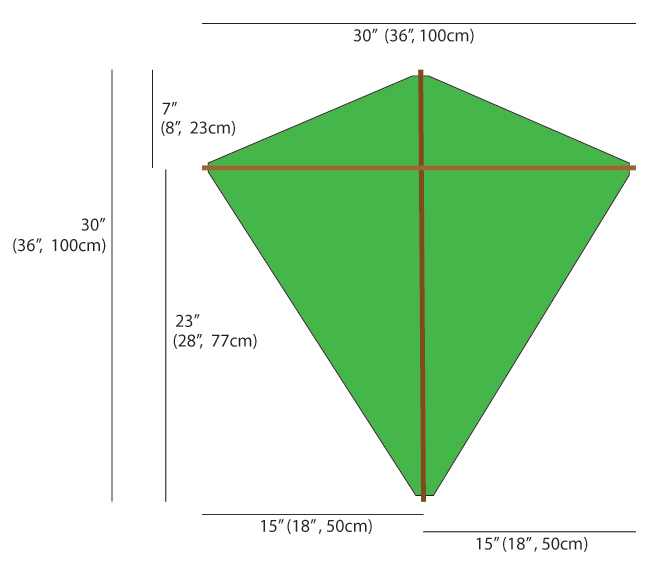
You will first need to determine the size of your kite. Remember, bigger kites pull harder, and require more strength to handle. For children, a smaller kite may be better. We can use an example of a simple diamond kite, called an Eddy.
An Eddy kite can fly with no tail, but one can be added if desired.
The basic design is 36″ tall and 36″ wide. The two wooden or graphite spars cross at right angles. You can make the kite 100cm x 100cm, if you would like your kite a bit bigger, or size it down to 30 inches x 30 inches for children. For 36 inch or 1 meter kites, use 5/16″ ramen dowel, for 30 inch kites, you may use 1/4 inch dowel spars. I have shown the 30 inch kite below, with optional 36″ or 1 meter dimensions in parentheses.
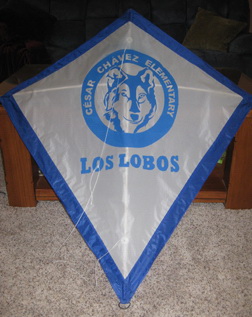
If you wish to have a border around the kite, in a contrasting color, you can adjust your measurements accordingly. Get Ripstop nylon in your desired colors to make a border like the one on the Los Lobos kite below.
When sewing Nylon, I highly recommend Double Sided Seam Tape. It will make your life MUCH easier. It is double sided and in a pinch will hold the seam, even without sewing. For the Los Lobos kite above, I put downt a length of seam tape along the white edge Then I just overlap it by 1/4 inch with the blue border. Then I over sew with a small zig-zag stitch. When you get to the corners of the diamond shape, you will have to chose to make a seam along one angle of the blue, or to cut both pieces. I find it easier to just seam along one piece, then cut the next blue piece to fit, and continue like that.
Wooden dowels are available at local hardware stores or at Goodwinds.
The classic EDDY kite has a string border which runs around the edge of the diamond. This would require creating a small channel for the string by folding the edge over towards the back 1/4 inch, then again 3/8 inch. That folded border is then sewn down close to the exposed fold with a straight stitch. For these smaller sized kites made of strong rip-stop nylon, you can skip the edge string if you fold over the edge 1/4 inch and then another 1/4 inch and sew that hem down. The stiff hem essentially substitutes for the edge string called for by William A. Eddy in his original plans in 1890.
You can get good flying line and line for bridles and edge cord from Goodwinds. A Braided Dacron line is good. 30 Pound Braided Dacron in a 500 foot roll is plenty for several kites of this size.
If you are going to make the 30 inch kite and use the 1/4 inch dowels, consider getting one these Plastic Dihedrals. It will join your spine (vertical spar) with your spreader (cross piece). You will cut your cross spar in half and insert it into this plastic device. (Please note, the link and image on their page says 3/16 inch, but the product number is for 1/4 inch dihedral.)
I prefer to skip the plastic dihedral and just bow my kite with a length of flying line string (so did William Eddy!) If you wish to skip the plastic dihedral piece, just tie the vertical (spine) and horizontal (spreader) together with some Dacron line, or use plastic zip ties.
A note on cutting Rip-stop Nylon. You can cut it with scissors, but it will have a tendency to fray along the cut lines, leaving unsightly strings. The best way to cut it is with a metal straight edge, like a yardstick you can find at Ace Hardware. They are often made of aluminum or steel. I use a soldering iron with an angled tip to “hot cut” the material. Place the rip-stop on a glass surface, one that won’t be damaged by the very hot cutting tip on the soldering iron. Just lay the metal straight edge on the cut line, and slowly move the hot cutting element along the straight edge. If you have an old wood burning kit gathering dust in the closet, it may have a heat pen with an assortment of tips. This seals the edge as you cut. The edge is perfect and does not fray.
You will want to make spar pockets.
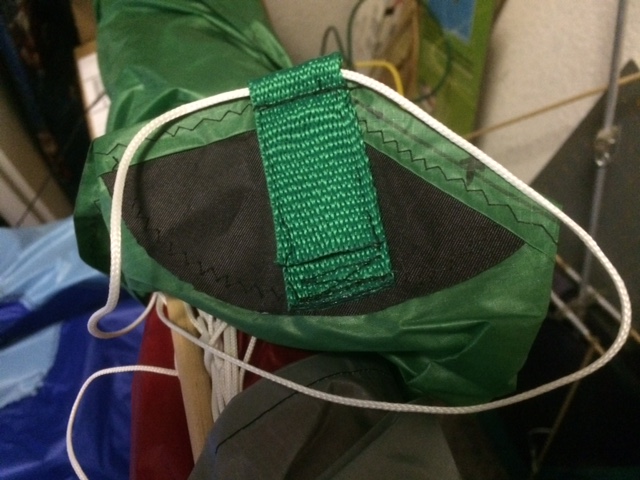
These are not absolutely necessary, but are advised. I use 3/4″ or 1″ nylon webbing, available at your local hardware store. You need about 1.5 feet of it. To make a spar pocket, you cut the strip about 4 inches long. Fold it over on itself with about a half inch sticking out. Sew across the folded end about 1/4 inch from the fold. This will leave a channel for the edge string or bow string to go through. You can sew the pockets to the corners of the kite. Place the pocket LONG SIDE DOWN against the back of the kite, and sew around the edges, leaving the short side open. You may notice, I also “hot cut” the webbing. The ends are heat sealed. This will allow your spar to fit in.
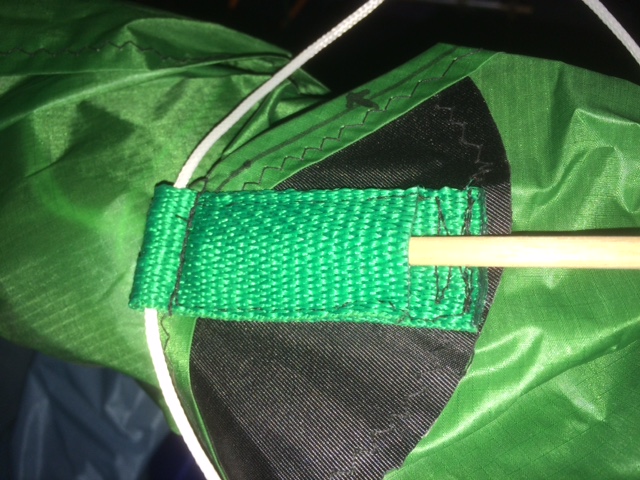
If you look at the Los Lobos kite above, you will see I put a small loop of black string through the bottom spar pocket. This is there in case you wish to attach a tail to the kite for stability in higher winds. This green kite is a VERY LARGE kite. On this large kite I put a Dacron patch behind the spar pocket to prevent it from tearing out.
Now you should have a diamond shaped kite sail, with four corner spar pockets attached. You should have two dowel pieces bound together, or three pieces if you are using the plastic dihedral. You will now need to make a BOW string and a Bridle line.
For the bow, put a string through one of the side pockets, and tie it
off to itself. take the bow line to the other side pocket, thread
it through the string channel, and bring it back to the bow line. Tie a
bow line knot so that it can slide along the bow line to tighten it. Or
you can make a button tensioner. The button tensioner is a cute little
device. 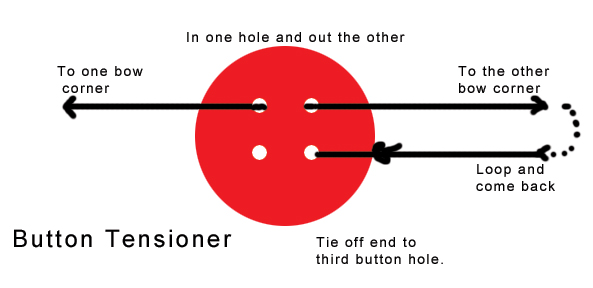
Now you can slide the button along the bow string to get a three inch gap at the middle of the kite (from the sail to the bow string.) The button will hold the bow in place. If you need a little more bowing, just move the button a little more along the line. When you are done flying, release the tension by sliding the button back.
The bridle should be tied to the vertical spine about an inch above or at the horizontal spreader. You will need to make a small hole in the sail to pass the bridle line through. Once again, I usually burn the hole with the tip of a soldering iron or the like. This prevents unraveling of the fabric. The bottom end of the bridle line can be placed either at the bottom of the spine, or a few inches up from the bottom. If you place it up from the bottom, you will need another hole in the sail to pass it through. The Bridle line is just a piece of string about 60 inches long to start. Tie it to the points mentioned. (A three point bridle can also be made which can adjust side to side differences if your kite is a bit lopsided after sewing.)
Hold the assembled and bowed kite at a 45 degree angle. pull the bridle string directly away from the kite, and mark the place where the angle forms. You can attach the flight line at that point with a double larks head knot. That type of knot is adjustable up and down an inch or so to get the best flight angle for the prevailing winds.
If you need to make a double larks head knot (also called a Prusik knot), look at this.
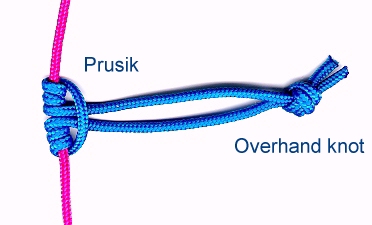
Make a loop of line using an over hand knot. Attach the loop to a straight line (your Bridle line at the point you marked above) with lark’s head knot, and continue making one or two (recommended) more twists around instead of one. Make tight and tidy. The knot should still slide on the straight line. Bend the Prusik knot to U-shaped and it locks. you can unbend it and move it up or down the bridle to change the angle of attack the wind has on the kite sail.
The final flying line should have a simple overhand loop tied to the end of the line. A simple slip knot will go around the loop pictured above between the Prusik and the overhand knot. It will slide down to the overhand knot and securely hold the kite. After flying, it can be loosened and removed so the flying line spool can be put away or used on another kite.
If you run into problems or have questions, send me a message on the contact page, or leave a comment below.
If you wish to get the hang of it by practicing making a kite out of a couple sticks, household string and a garbage bag (maybe a $3 investment) look at this easy to follow video.
Cheers,
Jerry
JerryCraft